Monday 31 March 2014

Machining Practice


The session started by the facilitator going through the terminology of machining and these included;
# Milling - which means taking some materials off a certain piece done by machine like the CNC machine which are programmed to manufacture the required shape.
#Grinding - this is a process of rubbing off some materials to reduce size or diameters like crankshafts.
#Stamping - which is basically shearing the materials like sheets of metal to make holes through instead of using drill bits. Below is a picture of a bracket i stamped after cutting it on the Guillotine and then bending on the Sheet bender before cutting off excess length using a hand bench snipper.


In actual fact safety comes first, every machine has safety rules and regulations to follow before, during and after use. The facilitator then demonstrated with a round piece of polythene, by using the lathe to reduce the diameter of the rod and making fine threads on it. it was drilled on the other side which was not supported and the tail stock the supported the loose end when the length was increased from the chuck side. The tool post is where the cutting tools are mounted and it can be rotated so that different angles of cutting can be achieved.

                                                        Lathe Machine          


                                            Guilotine Machine.


Treadle Shear/ Guillotine


This is the machine that i used to cut the required piece of metal sheet to stamp and bend to make a bracket shown above. The machine is foot operated to cut off the pieces. safety is to be observed not to place the fingers under and beyond the guard. The sheet to be worked on has to be marked so as not to waste material and right sizes to be achieved.


Tuesday 25 March 2014

DC motors.

I learnt about parts of a direct current motor, which include Shaft, armature, windings, bearings, commutator and brushes as the picture below;


A DC motor converts electric current into mechanical movements, i.e Rotational movement known as torque or turning effort therefore can be used to drive a number of systems. One example is a starter motor which drives the car Engine to start or a window winding motor to close and open car windows.

Brushes are always in contact with the commutator which is attached to the ends of the individual windings around the armature which are insulated to avoid short circuits. The commutator is a split slip ring so that when the motor is running, it should not produce reverse current to induce drag against direction of rotation.
Bearings hold the shaft in a true rotational position to avoid it touching the outer casing and magnets.

When the motor is given current the armature becomes an electro-magnets which react to the permanent magnets on the casing and this causes rotation of the armature shaft which can drive any desired component. When there is no current flow, electro magnetic force collapses and the motor stops. To change the direction of rotation only polarity of the current is reversed and the more the current the more the speed of the motor. the relationship of speed and torque is that torque is maximum at start and continues dropping as speed increases, But as current is increased torque increases. Efficiency on the other hand increases sharply after idling speed and starts dropping slowly as speed continues to increase.

Nowadays motors are driven electronically from pulse generators which operate transistors which in turn switch the motor ON and OFF at a high frequency, this allows a small current to be used in the control circuit and to vary the speed only the switching time is varied. This allows the system to be automated and self monitoring.


Tuesday 18 March 2014

Control Systems.

The facilitator led us through the components of any control system, which include Sensors which collect data from a physical system and send signals to the  decision making part (Micro processor) or computer which looks at the preset rules it was given beforehand to use in deciding what command to give to the Actuators to perform a certain function within the physical system again. One of the examples of such systems is the operation of the electric cooling fan in a car, The Temperature sensor sends a signal to the computer box indicating that the engine is hot, the microprocessor then commands the fan switch to close the circuit to the fan, to allow current to flow and the fan will run. when the temperature is low, the sensor sends another signal to the microprocessor which commands the switch to open the circuit to stop current flow to the fan, therefore less air will cool the radiator.

We had examples of sensors, mostly switches which are normally open and some are normally closed. We looked at single pole, single throw and double pole double throw as shown in the pictures below.

ingle Throw Switches

This is about the simplest switch--it makes or breaks a contacts between two lugs.


You would typically use this for a power switch.

Dual Throw Switches

This is the most common family of the mechanical switches, dual throw means you are switching one or more lugs between two positions.


  We them started to set rules which would be given to the decision making component of a system but i ended up not able to test them on the actual system..


Engineering report writing.

I learnt about report writing as a way of communicating information in a comprehensive way and it is structured as stipulated below;

The Title page.
This gives information of who wrote the report, the date and any relevant information identifying the module covered. the report is manly presented in a past tense.

Abstract
This is a brief summary of the report which indicates the scope and breath of the activity done.

Table of contents
This shows where specific things are found in the report.

List of figures and tables or Attachments.
Here there is a list of figures and tables included in the report so that they can be distinguished easily.

Main body
Here every detail of the process is described in full length, how the activity was done, key features, what was found, problems encountered and remedies.

Conclusion
This details the importance of the activity and what was learnt and recommendations.

References
This tabulates where external information was sourced from.


Tuesday 11 March 2014

Safety and usage of wood working machines.

We were taken through the safety aspects in the Wood workshop by the technician, Showing us how to operate each machine, from switching ON to finally switching OFF after use. This included how to set them for correct use without compromising safety.

They are categorized into three classes, which are differentiated by color codes, which are Green, Amber and Red. These groups are used as follows;

Green labelled machines can be used by students without supervision and can ask for for from the workshop technician if need be.

Amber labeled ones are also used by students only under the supervision of the technician.

All the Red labelled ones are for staff usage only.

In the afternoon, it was our turn to demonstrate to use some machines, the facilitator cut equal pieces of boards for each learner, we were given a drawing that we had to mark on the piece and use machine to cut it out. Below is the facilitator cutting out pieces for us while demonstrating how to use the machine safely as seen using the push stick and holding the longer side of the bigger board.


The picture below shows the drawing i was given, the board piece and the final product i made using machines. Even though i managed to cut out the shape required, i exceeded the measurement from the inner shape during cutting, but i leveled the curve with a hand file.


Tuesday 18 February 2014

Motor Deconstruction

We were given a motor to disassemble, We did and noted each part as we progressed, Looking at the materials, manufacturing process and usage. Some of the parts included armature, brush contacts, permanent magnets, worm and wheel as illustrated below.

Displaying photo.JPG

We recorded features of each component on separate sheets, stating their use, material and method of construction and estimated values as shown in the picture below.


Displaying photo.JPG

After examining each part we then re assembled he component together and worked on a computer mouse which we did the same. attached is the disassembled mouse.

Displaying photo.JPG


Tuesday 11 February 2014

Precision measurements.

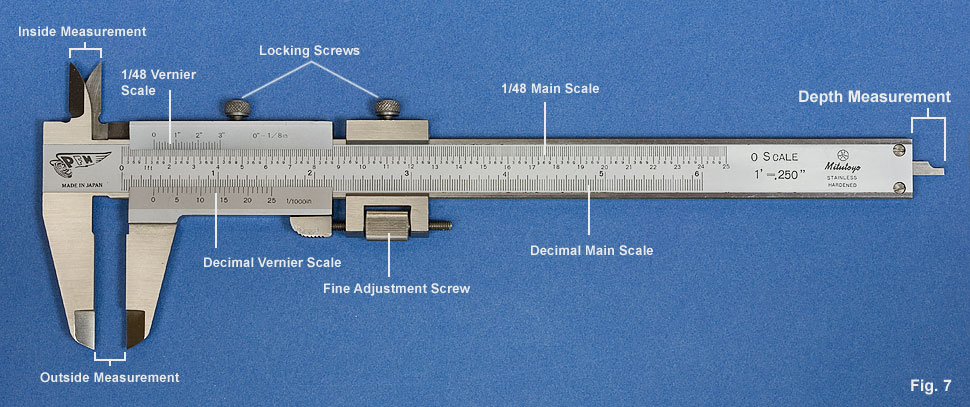
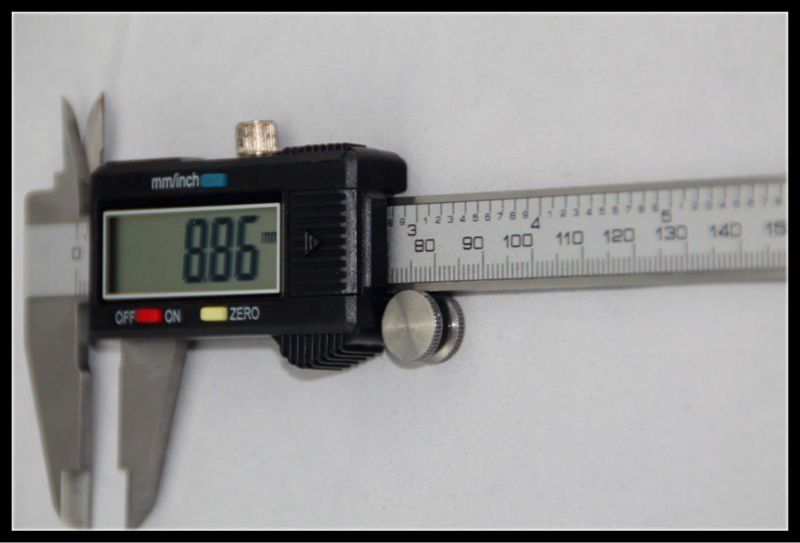
We were taken through precision measuring instruments, mainly Micrometers and vernier callipers which have accuracies of  0.01 and 0.02 millimetres. We went through the steps of how to read the instruments during measuring. The digital vernier calliper anyway is more accurate as the reading is displayed and just read straight away. A vernier calliper measures round and flat surfaced items and there are different sizes for different diameters, e.g One can measure from 0 - 25 mm and the other from 25 - 50 mm. Vernier callipers also measure the same and the include Depth and internal diameters. Below are pictures of the instruments we used. Before using the instruments they have to be zeroed first and lock them after measuring to ensure accurate answers.

Top.  Vernier calliper.          Middle. Micrometer.      Below. Digital vernier calliper.

.


Later i drew a bracket using third angle projection and  used the micrometer and vernier calliper to measure its dimensions to label the drawing correctly as per the evidence below.


Monday 10 February 2014

Bridge construction. {structures}

We were issued with materials to construct a bridge which would hold a reasonable load. we started by sketching how the bridge might look like as in the drawing below.


We built it using the straws, cello- tape and blue tack. there was also a string to suspend the weights during the testing of the bridge. This bridge out classed other groups work by carrying more load because it had triangular supports which made the base to resist bending forces to a larger extent.
1. Bridge constructed from the above sketch. (Burmese bridge)

2. This is what we did to reinforce the bridge underneath as at the top to increase its weight carrying capacity. 

The idea of just only reinforcing the initial bridge was because we had learnt that the height or depth of any item improves its stiffness or strength against sagging due to load applied. we had calculated two examples of moments of inertia in class. This made us to realise that even though the bridge can be narrow, with the reinforcements making the structure deep and tall enough, it would manage to support more load. It finally did so supported by the class calculations below.  


 This is to show dimensions of the bridge.


4. The bridge in three dimensions.
  

This bridge (Burmese bridge) carried the heaviest load than all .bridges built by other groups as verified by the facilitator's results after testing all bridges. results can be viewed through the link below. 


Tuesday 28 January 2014

Energy sources, Power and transmission.

I learnt about different types of energy from the facilitator. Energy is described as the ability of  any given body to do work, either by moving from one point to the other.

Some more examples of energy sources are solar, which comes from the rays of the sun, Geothermal which comes from the earth's crust, We mainly concentrated on Kinetic and Potential energy.
I was clear that energy is never destroyed nor created but only changed from one form to the other and during this process usually heat is generated.

Potential energy is the energy possessed by a body because of its position relative to the ground, the more distance its lifted off the ground the more it gains potential energy. A question was asked whether electricity is energy or source of energy but the answer is electricity is non of both but only a catalyst which drives the energy {Electrons} to do or be used to do work like driving motors.

The facilitator cleared the fact that from power generation plants, a small current is driven by bigger potentials in Voltages to avoid trunks from overheating as there will be losses along the way due to factors like resistances of the cables due to length, but in domestic use, the voltages are lowered and the current used goes up a bit because here we need to heat up things like water quickly.

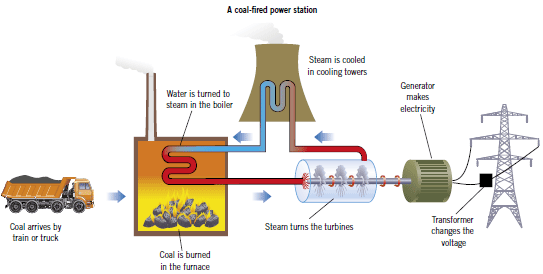
Electricity is generated from a number of sources including wind, solar, fossil fuels like coal and even hydro stations driven by water flow or steam as illustrated by the diagrams below.

.


Hydro power station.


Wind mills to generate electricity.


All types of electricity generations have their disadvantages of being expensive  build and run  and this makes coal to be the most common and cost effective way of producing electricity worldwide as per the pie chart below.


Thursday 23 January 2014

Orthographic projections.

On Monday 20th I learnt about the differences between first and third angle projections in engineering drawing. This really deals with the positioning of different views of the object drawn.
In the third angle the view is drawn on the side the object is viewed from while with first angle the view is drawn on the other side of the object viewed.

I then drew the view of the bracket below in third angle. The main problem I had was that I did not allocate proportional spaces for different views. This is why the bottom view is next to the plan view.


Tuesday 14 January 2014

My knowledge.

Deconstruction / systems analysis.

Partially done this at my workplace in disassembling vehicle components and assembling them together after some repairs are done or replacing other components.

Pneumatics

Experienced this on truck brakes which only uses air without brake fluid. I was repairing leaks of air pipes.

Hydraulics.

This is a common system on all small and pick up vehicle brakes where I had to replace components and bleed the system to remove excess air for efficient operation during braking.

Basic accurate measuring techniques and methods used in engineering.

measured a crankshaft, brake drum diameter in a repair workshop but I am not confident with it.

Transducers and sensors

I know different sensors on a vehicle like the air temperature sensor, coolant temperature sensor, wheel speed sensor and a few more but not exact with transducers which I believe to be actuators.

Motors

These are common in the automotive industry, these include starter, alternators and wiper motors which I have been working on for a long time.

Levers and gears

Levers help individuals to apply less effort to move heavy loads or even engage gears in a manual gearbox of a vehicle. Gears transmit drive from one point to the other through shafts.

Energy, energy storage, energy conversion

Energy is in different forms like electrical in batteries, chemical in the fuel and mechanical which involves manual movements and kinetic which is motion too.

Static and dynamic structures in engineering

Static means things which are stationary while dynamic means things which move to do work.

The use of breadboards in electronics.

This is  not really complicated I used them in some of the experiments in the lab.